2. Highlight “MyDemo” project folder, and Project->New Folder to create a new folder named “Icons”.

3. Project->Add Existing Item …, and select icons to add them into the “Icons” folder.

4. Project->Add New Item …, it should bring up the following dialog.

Choose “WPF” as Category and “User Control (WPF)” as Template. Use “MyToolBar” as the class name. Click “Add” button.
5. Open MyToolBar.xaml. Change the following code,
<UserControl x:Class="MyDemo.MyToolBar"
xmlns="http://schemas.microsoft.com/winfx/2006/xaml/presentation"
xmlns:x="http://schemas.microsoft.com/winfx/2006/xaml"
Height="300" Width="300">
<Grid>
</Grid>
</UserControl>
to as follows, and assign a unique ID to it. The unique ID is for layout persistent. It should be between 1,000 and 10,000,000.
<src:FlexToolBar x:Class="MyDemo.MyToolBar "
xmlns="http://schemas.microsoft.com/winfx/2006/xaml/presentation"
xmlns:src="clr-namespace:LinsUIWPF;assembly=LinsUIWPF"
Height="300" Width="300" ID="1010">
<Grid>
</Grid>
</src:FlexToolBar>
6. Open MyToolBar.xaml.cs.
Add the following line,
using LinsUIWPF;
and change the following code,
public partial class MyToolBar : UserControl
{
public MyToolBar()
{
InitializeComponent();
}
}
to as follows,
public partial class MyToolBar: FlexToolBar
{
public MyToolBar ()
{
InitializeComponent();
}
}
7. Close MyToolBar.xaml, then reopen it again, the screen should show the following,

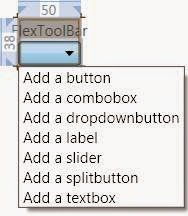
8. Click the combo box; it will pop up the list,
9. Select “Add a splitbutton”, and then click and select the new created splitbutton,

10. Go to Properties panel. Choose an icon, and enter for “Text”, “ToolTipText”, and “HelpContext”. Assign an unique ID to it.

11. Click the combo box; it will pop up the list, select “Add a menuitem”

12. Select the new created menu item.

13. Go to Properties panel. Choose an icon, and enter for “Text”, “ToolTipText”, and “HelpContext”. Assign a unique ID to it.

14. Continue to add items
15. Open Window1.xaml.cs.
Add the following code,
public partial class Window1 : LinsMDIWindow
{
public Window1()
{
InitializeComponent();
MyToolBar myToolBar = new MyToolBar();
myToolBar.ShowToolBar(this, null, null);
}
}
References:
Command,
Command Events,
Commands Manager,
Create a Command,
FlexToolBar,
Features,
How To,
Index,
Instruction,
LinsUIWPFDockingManager,
Tool Items Manager
No comments:
Post a Comment